Become a Patron!Support our reviews, videos, and podcasts on Patreon!
Cool tools really work.
A cool tool can be any book, gadget, software, video, map, hardware, material, or website that is tried and true. All reviews on this site are written by readers who have actually used the tool and others like it. Items can be either old or new as long as they are wonderful. We post things we like and ignore the rest. Suggestions for tools much better than what is recommended here are always wanted.
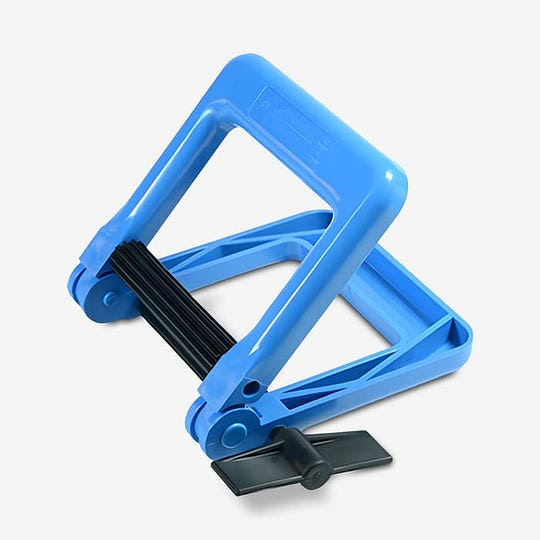
My new favorite tool is the Tube Wringer, from Gill Mechanical.
From their website: “The Tube-Wringer efficiently squeezes the contents from tubes of caulk, glue, medical compounds, adhesives, and toothpaste. Nearly indestructible, the Tube-Wringer will last a lifetime under normal use and pay for itself in short order.”
In addition to sqeezing every little bit out of just about any tube, the squeezed part is left with a zig-zag texture so future usage doesn’t undo the squeezing. Tubes are left efficiently squeezed, and cool looking. My only problem is that I wish I had more partially-used tubes available because it’s so satisfying to squeeze every last bit out of them. — Sally Rosenthal
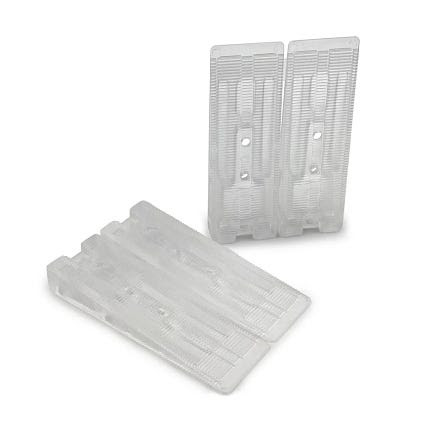
As a grad student, I spend a lot of time working on a laptop in coffee shops and living in old houses. What that means: sitting at notoriously-wobbly cafe tables and shimming furniture on uneven old wood floors. Wobble Wedges are small, clear plastic shims with a ridged surface that are invaluable in both instances. Since they weigh just an ounce or two, I always keep a couple in my computer bag (better than jamming newspaper under a coffee shop table). I usually go to a coffee shop twice a week, sometimes more, and find myself having to use them about 30 percent of the time. Sometimes I forget and leave them behind, but they’re cheap enough it’s no big deal. At home, these also work great because they are clear enough to be almost invisible. They are plenty strong enough for a fully-loaded bookshelf and, in the five years I’ve been using them, I’ve never had one break down or crack. Losing them is another story: I once used some to shim a pedestal sink and never saw them again. But the sink never wobbled either! — Donovan Finn
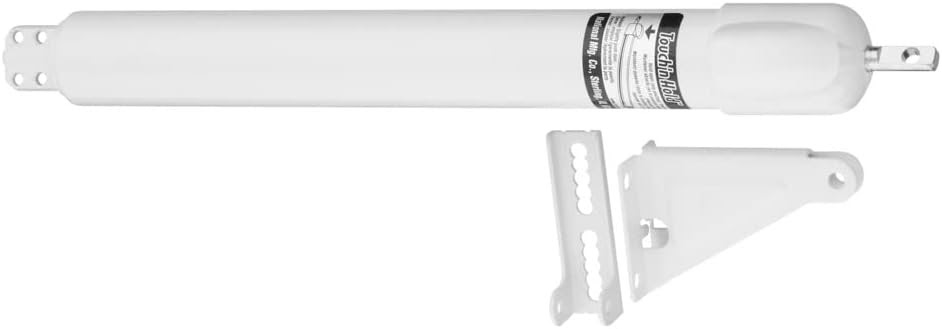
If you have a storm door or screen door, you probably have a pneumatic device that closes it. And the device has a little washer thing that will hold the door open if you put down your bags, and the baby, and let the dog go free while you fiddle it down the bar, so it can jam against the piston. It’s a hassle.
The Touch n’ Hold is a device that makes this a happier moment. The Touch n’ Hold door closer lets you set the door open with a simple tap of your toe or elbow. Then once you’ve got all your stuff inside, just nudge the door (not the thing) open a little more and it will go back into closing mode.
I use it every day, and it always makes me think of Cool Tools. — Thomas T. Ballantine
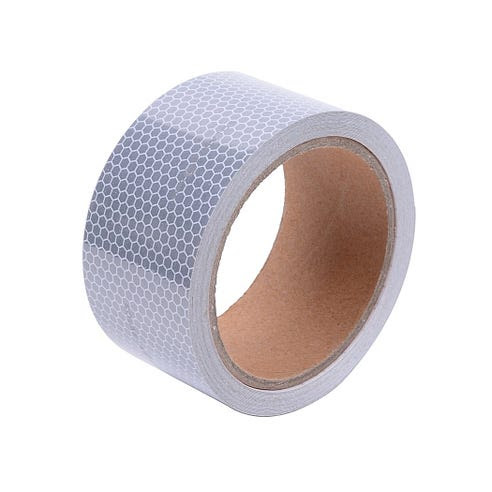
We’ve been using 3M’s SOLAS reflective tape for several years. It was designed for the Coast Guard to use on life jackets, so you know it has to be tough and withstand time, bad weather and wet conditions (SOLAS = safety of life at sea). It is a bit expensive, but it is the brightest and most durable stuff I’ve ever found. We use it everywhere and have put in on just about everything: garbage cans, walking sticks, jackets, kayaks, a bicycle, a stroller, a trailer, traffic cones, automobile door jams (so oncoming traffic sees me right away), the trunk of my car (an instant safety device if I get stuck on the side of the road) and the car’s mudguards. The strips on our mudguards — which take a lot of abuse! — are still sticking after more than seven years. Now that I’ve seen how effective it is, I really think it should be a law that all cars come stocked with reflective stripping on door jams. — Jeff Ellis
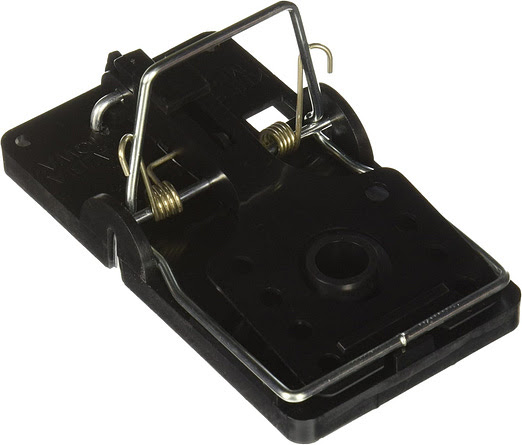
There are certain less-than-glamorous homesteading chores that I am really good at. Shoveling, doing dishes, and trapping rats. Sigh.
Rats around here are not the loathsome Norwegian variety, but rather wood rats, or pack rats, which look like a big mouse — kinda cute. In the woods, rats build pyramids of twigs 3 feet or so high — rat architecture — always in secluded spots, so you have to be bushwacking to come upon them. In semi-rural areas like mine they cruise human habitations for easy pickins. One year I trapped over 40.
For years I used the standard wooden Victor traps and would put peanut butter in a little piece of plastic (with punched holes), tied to the trigger with baggie ties. Then I started sheet-metal-screwing a 1/2″ copper pipe cap to the trigger, which I filled with peanut butter.
I went through maybe 4 types of other traps until I discovered these. They have a bait cup so the rat has to tug at it, thereby releasing spring—plenty strong enough to ensure fatality.
I’m writing this after getting one last night that had been eluding me for a week. Outwitted by a rat night after night.
Method: I washed 3 traps (getting rid of scent), smooshed some bacon in the cups, surrounded by smears of Skippy peanut butter — mwah!
And whack! Mighty hunter. —Lloyd Kahn
Once a week we’ll send out a page from Cool Tools: A Catalog of Possibilities. The tools might be outdated or obsolete, and the links to them may or may not work. We present these vintage recommendations as is because the possibilities they inspire are new. Sign up here to get Tools for Possibilities a week early in your inbox.