25 July 2026
Gar’s Tips & Tools Issue #213
Access to tools, techniques, and shop tales from the diverse worlds of DIY
Getting a Handle on Things

Every tool has two functions. One is the job it was designed to do (aka the business end). The other is how it interacts with you, the user. Manufacturers optimize the first and often don’t give enough thought to the second. For those with ability issues, it’s often on you to buy or DIY a better human interface.
The goal isn’t just comfort. A larger, softer handle spreads the force across more of your hand, reducing the amount of squeezing your fingers have to do. That means less pain, less fatigue, and, perhaps most importantly, more time spent making things than recovering from making things.
There are all sorts of ways you can create custom, ergonomic handles. Here are a few approaches worth exploring.
Foam Grip Tubing

This is the simplest place to start. Occupational therapists have been recommending foam tubing for years. The tubing slips over existing handles, instantly increasing their diameter while adding a layer of cushioning. It’s inexpensive, easy to cut with scissors, and available in different sizes and colors. It works on everything from screwdrivers and paintbrushes to knitting needles, gardening tools, kitchen utensils, and pens. It isn’t glamorous, but offers a real comfort upgrade for only a few bucks.
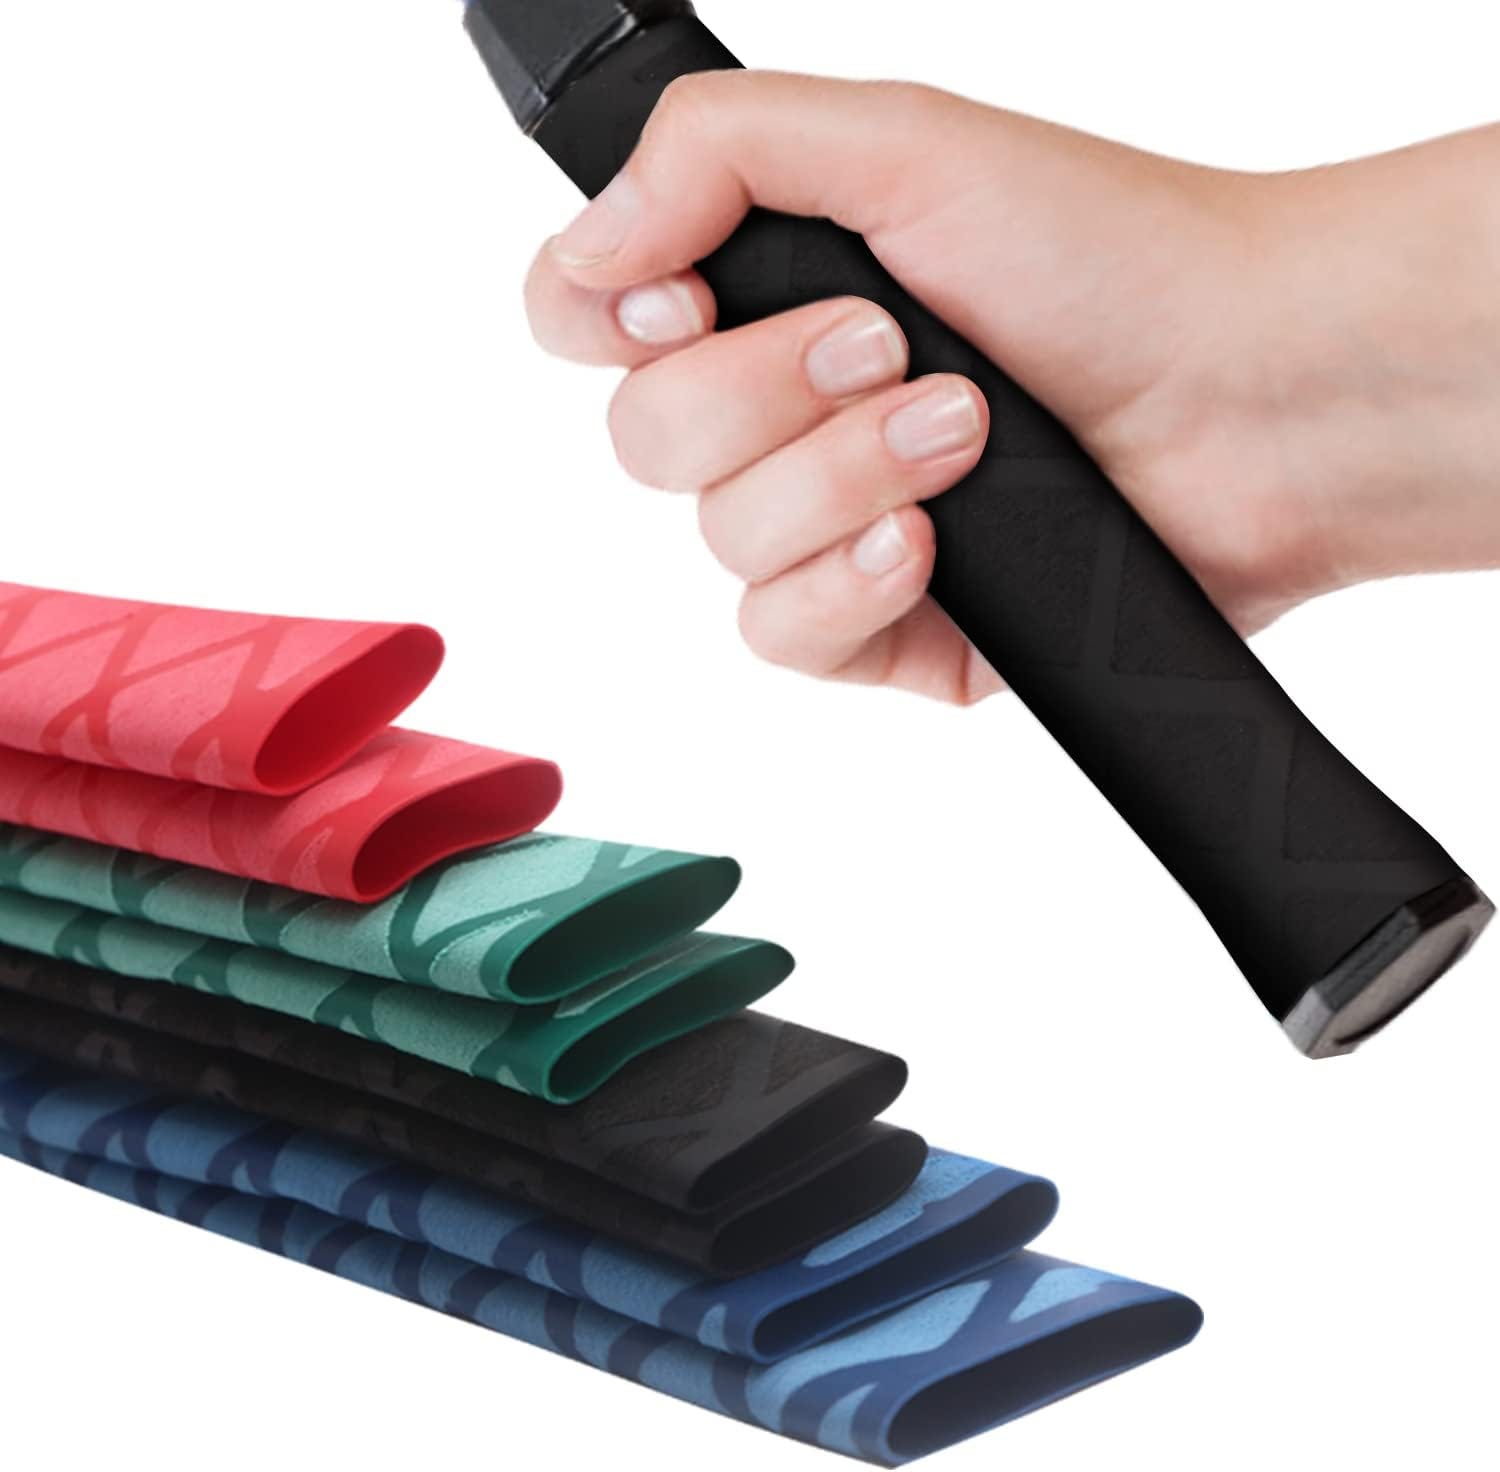
Self-Adhering Wrap

You’ve probably seen the stretchy wrap used to wrap hockey sticks and other sporting equipment. That same material makes an excellent custom tool grips. Add layers until the handle feels right to you. It’s inexpensive, washable, and gives you complete control over the final shape. And when it wears out, you just remove and re-wrap. Self-stick bandage tape also works. Here’s a video of that approach in action.
Heat-Shrink Tubing
For a cleaner, more permanent solution, consider heat-shrink grip tubing. Slide it over the handle, warm it with a heat gun, and it contracts into a snug, durable covering. It looks surprisingly close to a factory-installed comfort grip and stands up well to regular shop use and abuse.
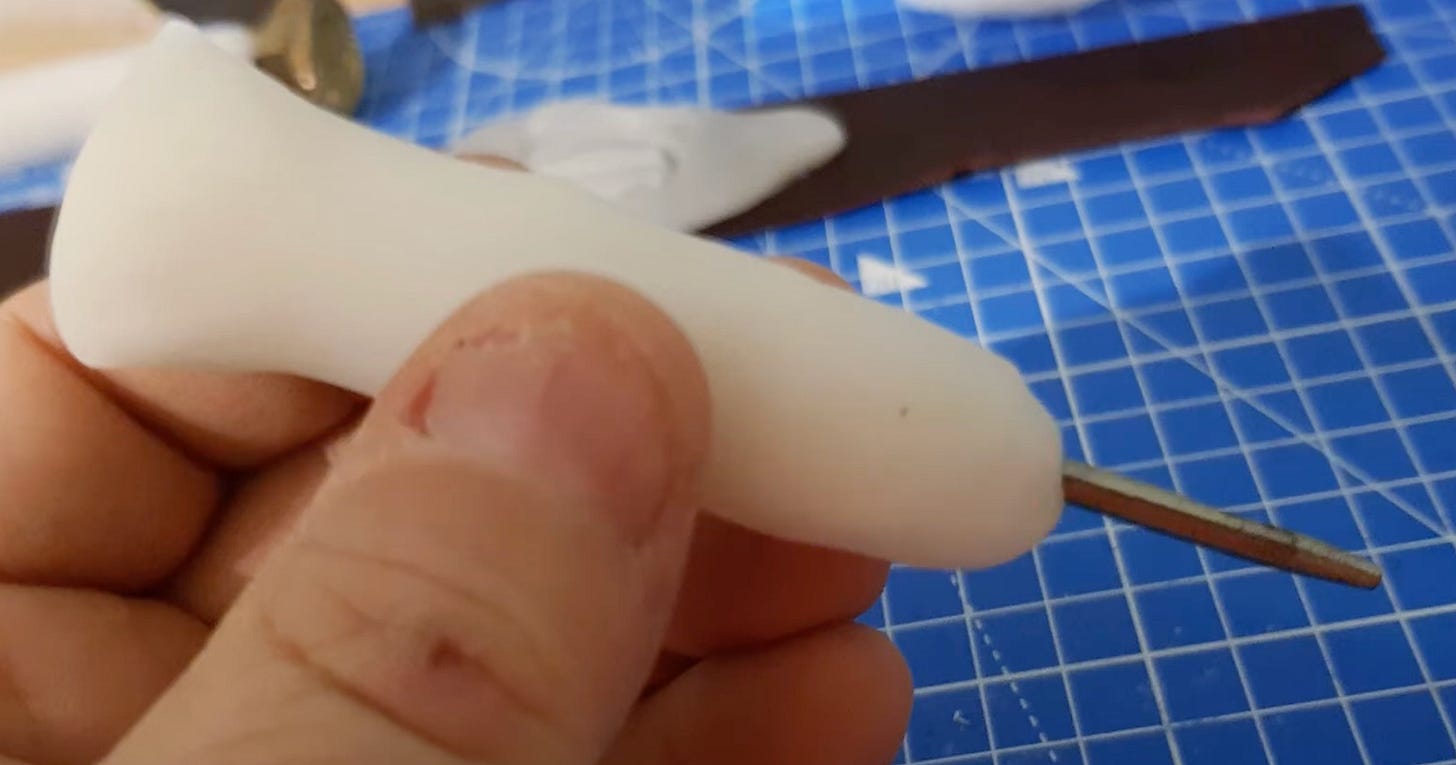
Mold Your Handle to YOU
This is where things get truly personal. Several products let you create a grip that’s custom-shaped to your own hand.
Sugru is a moldable silicone putty that stays workable for about half an hour before curing into flexible rubber. Wrap it around a handle, grip the tool naturally, and your fingers create a perfectly fitted handle. The next day, you’ve got something that feels as though it came from a custom orthopedic workshop.

Another option is moldable thermoplastic pellets, sold under names like Polymorph, InstaMorph, and Polly Plastics. You just drop the pellets into hot water and they become soft enough to mold like clay. Here’s a quick video on making a basic handle with Polymorph.

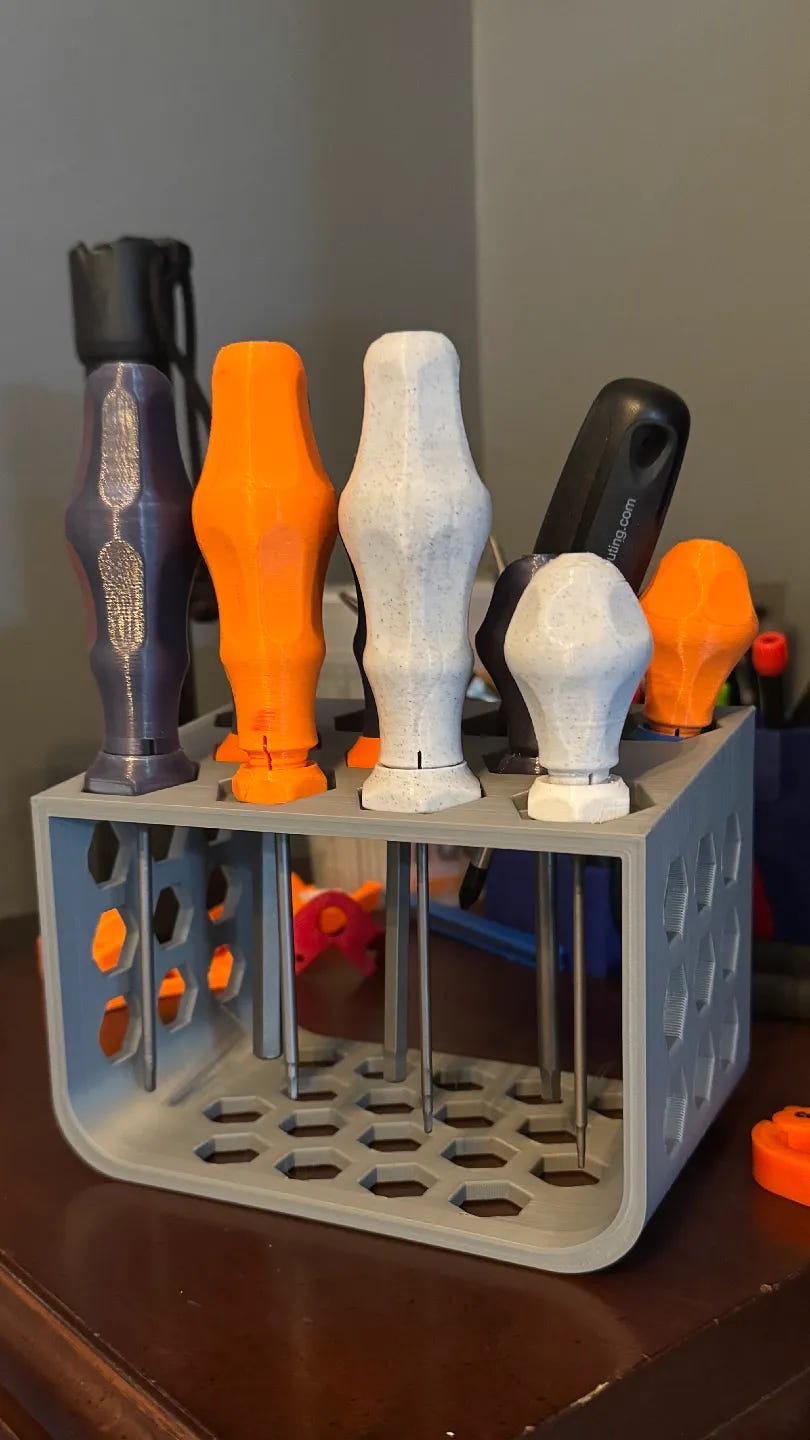
If you have access to a 3D printer, there are all sorts of ergonomic handle designs available online or you can design your own. Seen above is a set of ergonomic 3D printable handles on Printables by Bryce Lowe.
One of the great joys of being makers is that we have the knowledge and wherewithal to modify our environment to fit our needs. Our tools deserve the same attention. If a handle hurts, don’t assume you’re the problem. Redesign the handle.
Have you modified a favorite tool to make it easier for you to hold? Did you invent a grip using something unexpected? Send me a photo and tell me what worked. I’d love to see your solution.
DiResta’s CNC Tips

I always love when Jimmy DiResta does these tips videos and he hasn’t done one in a while, so I was thrilled to see this latest installment on CNC Tips. In it, he covers a broad range of tips, from the basic to “woah!”-level ideas. Some of what he covers: Cutting a shallow placement outline into the spoilboard first, drawing the cutter diameter into your CAD drawing before machining to check for clearance, modifying the Z-zero plate with multiple stepped reference depths, using wedges for work-holding instead of elaborate fixtures, inspecting V-bits with a cheap digital microscope, and raising or lowering Z-zero by a business-card thickness rather than immediately changing toolpaths.
And my favorite of the video, a real “Why didn’t I think of that?,” marking “TIGHT —>” on your collet wrench.
Building a Dream Desk
Most of us electron wranglers spend the majority of our waking lives at a desk, our eyeballs glued to a screen, our fingertips softwired to a keyboard. Like when you realize that you spend a third of your life in bed and decide to invest real money in a great bed and bedding, Morley Kert, in this video, realizes that, given all the time he spends at a computer desk, it’s worth building himself the ultimate workspace. And for him, besides a generous L-shaped desk, that meant drawers, drawers, and more drawers.
The video walks through every step of his process, from planning and building the desk to constructing over 80 drawers (he built the cabinet bodies and then 3D printed the drawers themselves), through the final finishing and assembly.
My biggest takeaway from this video was the inspiration to seriously rethink my own work desk setup and to not be afraid to invest real time and money in my desk’s comfort, convenience, and usefulness.
Have you built a dream desk? If so, I’d love to see it.
Thanks to All My Subscribers!
I now have well over 10,000 subscribers to this humble little newsletter. And 50 paid subscribers. A million thanks to all of you. Doing this newsletters is a true joy for me and I especially like feeling like I’m connected to a community of fellow makers. Thanks to everyone who’s sent me an email, made a comment, shared a tip or tool. Let’s keep the ball rolling for another 200 issues!
If you want to financially support this work, please consider a paid subscription. It helps keep me in Pocket Notebooks. I appreciate you.
A very special thanks to Hero of the Realm subscribers: Moses Hawk, Jim Coraci, Donobster, Peter Sugarman, and Will Phillips for your generous support.
24 July 2026
Book Freak #219 — Deep Cut Edition
Beggars of Life: The hobo memoir that helped invent hardboiled prose
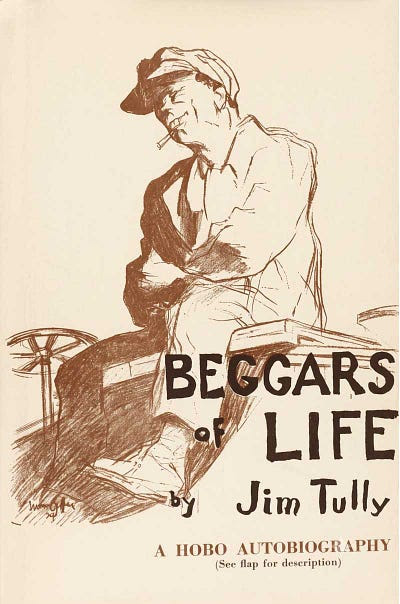
Beggars of Life is Jim Tully’s 1924 hobo autobiography, a young Irish-American orphan’s first-person account of riding the rails through early-20th-century America, written in stripped-down vernacular prose credited as the seed of the hardboiled school. I’ve turned it into a full Book Freak Edition for the Deep Cuts reading club, and if you are a paid subscriber, you can download the ebook below.
This is a featured pick from the Deep Cuts Reading Club, a paid subscriber benefit. Every month I take a forgotten public-domain book and make a free ebook edition and an experimental audiobook. Subscribers get access to a growing library, and help keep Book Freak going. Join the club here.
(If money is tight and you want to join the club, email me at editor@cool-tools.org, and I’ll comp you. )
In 1930, the silent-film star John Gilbert walked into the Brown Derby on Wilshire Boulevard, found Jim Tully eating dinner, and tried to punch him in the face. Gilbert had read Tully’s profile of him in Vanity Fair two years earlier and reportedly thrown up. He came at the table swinging. He missed twice. Tully had spent his early twenties as a professional lightweight boxer on the Ohio carnival circuit. He knocked Gilbert unconscious with one uppercut and went back to his dinner.
Tully was born in 1886 in St. Marys, Ohio, the son of an Irish immigrant ditch-digger. His mother died when he was six. His father couldn’t feed the kids, so he sent young Jim to St. Joseph’s orphanage in Cincinnati. He stayed there for six years before running away at fourteen and starting to ride freight trains.
For the next six years he was a hobo. On the road he went by “Cincinnati Red,” for his red hair. He worked as a chain-maker, tree surgeon, and dishwasher in a Leadville mining camp, tramped when he could, and read every book he could get his hands on. He stole books from libraries when he couldn’t borrow them.
By his mid-twenties, he had landed in Los Angeles and started writing. In 1923, Charlie Chaplin hired him as a personal publicist and ghostwriter. The job ended badly. Chaplin found out that Tully had been secretly writing an unauthorized biography of him on the side and sued the publisher to block its publication. Tully turned to magazine work. He wrote for Vanity Fair, Esquire, and H.L. Mencken’s The American Mercury. He invented the Hollywood celebrity profile as a beat. Before Tully, magazine writing about movie stars was puff. Tully went after them with the same eye he turned on bindlestiffs and railroad bulls. He was called “the man Hollywood most loved to hate,” a title he loved.
Novelist Rupert Hughes (uncle of Howard Hughes), his mentor, wrote that Tully “fathered the school of hard-boiled writing so zealously cultivated by Ernest Hemingway and lesser luminaries.” Tully was writing his stripped-down boxcar prose years before Hemingway published The Sun Also Rises.
His books are all worth reading. Circus Parade (1927) covers a season with a traveling circus and was banned in Boston and Atlanta for obscenity. Shanty Irish (1928) is about his savage Ohio childhood. Jarnegan (1926) is a Hollywood novel that was adapted into a Broadway play. Blood on the Moon (1931) is the boxing memoir. Beggars of Life (1924) is his most famous, and a good place to start.
Core Principles
The road as education
Tully treated hobo life as a serious apprenticeship. “It may be recorded here that hoboes regard their chosen profession seriously. There is much to learn in the game and more to endure.” He learned how to ride freight without losing a limb, how to beg without being arrested, how to spot a railroad detective from two boxcars away, and how to survive a Midwestern winter sleeping in a sand-shed.
Beauty in the gutter
In the middle of describing a freight yard full of lice-ridden tramps, Tully stopped to notice a “feather-tossed robin perched on a wire fence along the tracks…it looked hopeless and woebegone — a strayed reveller who had left a warm climate too soon.” He said of his own years in the gutter: “If my clothing was lousy I watched clouds sailing across the moon and heard linnets chirping and larks singing.” This is the trick the hardboiled school inherited from him: flat reportage of brutal facts, with sudden flashes of lyric grace.
Books as the one thing worth stealing
Tully stole from libraries throughout the book and is unapologetic. He carried Olive Schreiner’s The Story of an African Farm with him for two weeks while tramping to Chicago. He stole Dostoevsky’s Crime and Punishment in Colorado and spent days in a boxcar because he couldn’t put it down. The hobo is broke, lice-bitten, hungry, and devouring the great Russian novels.
No false ennoblement
Tully refused to romanticize the road. He shows you the punkgrafters who use children as begging tools, the dope fiends shooting water into their veins for the placebo of relief, the railroad bulls who shoot at men jumping trains, the prostitute he stole four dollars from while she was drunk. He does not soften any of it. But he also does not pretend that working in an Ohio factory was nobler than tramping. “Tramping in wild and windy places, without money, food, or shelter, was better for me than supinely bowing to any conventional decree of fate.”
Try It Now
- Sit for ten minutes somewhere you usually pass through without looking (a bus stop, a coffee shop counter, an airport gate) and write a paragraph describing one stranger you can see, with the same physical specificity Tully gives Billy on page 12: leather patch over the empty red socket, fingers yellow from cigarettes, the swagger as he ran for the train. This is the discipline that made Tully a writer.
- Take one activity you’ve been doing casually (cooking, gardening, your job, a side hustle) and treat it the way Tully treats hoboing: a serious profession with “much to learn in the game and more to endure.”
- Pick a difficult book you’ve been avoiding and start reading. Tully read Dostoevsky’s Crime and Punishment while sleeping on coke in a boxcar to Los Angeles.
Quote
“The road gave me one jewel beyond price, the leisure to read and dream. If it made me old and wearily wise at twenty, it gave me for companions the great minds of all the ages, who talked to me with royal words.”
Book Freak is published by Cool Tools Lab, a small company of three people. We also run Recomendo, the Cool Tools website, a YouTube channel and podcast, and other newsletters, including Recomendo Deals, Gar’s Tips & Tools, Nomadico, What’s in my NOW?, Tools for Possibilities, Books That Belong On Paper, and Book Freak.
07/24/2623 July 2026
Better Flyer Rights/Clip-on Earbuds/One-year Tourist Visa
Nomadico issue #216
Stronger Flyer Rights in Europe
Europe has made it clear they are siding with consumers instead of airline execs and just strengthened the continent’s protections for flyers. Compensation rates remain the same, but they’ve codified how fast airlines have to notify and compensate passengers (the big point of frustration previously) and beefed up rules around rerouting passengers and taking care of them during delays. Lots to digest, so here’s a good trade publication link, but note non-EU citizens are better off flying to Europe on a European carrier to get full protection. Otherwise you only receive it while flying within or out of Europe. None of the changes are law until a year from now though, so meanwhile you might want to get AirHelp.
Earbuds that Allow Outside Sound
I wrote in issue #185 about earbuds that use skull bone conduction to relay sound instead of blocking your ear canal. I’ve been trying another solution that’s kind of a hybrid when I listen to podcasts while biking or walking around near traffic—times I need to hear what’s going on around me. These iLive Electronics Open Ear Earbuds clip onto your ear and only partially block outside sound. The fidelity isn’t great (hey, they’re only $22 as I write this), so I don’t use them much for music, but they’re fine for podcasts or audiobooks and the battery has lasted me up to 8 hours.
Oxymoron “Basic First Class” Seats
Despite consumers repeatedly venting frustrations about how confusing it has become to simply book a vacation flight now, Delta Airlines decided that nine different fare classes wasn’t enough. So they’ve added three more. This sounds like something you’d read in The Onion, but they’ve announced “Basic First Class,”
“Basic Business Class,” and “Basic Premium Economy” tickets while somehow managing to confine their laughter to the boardroom. As you’d guess, these are bare-bones fake-outs that sort of look like the real thing but are loaded up with restrictions. If you ever wanted to pay double or triple for more legroom and…almost nothing else, this ticket class is calling your name!
The Best Tourist Visa in the World
I have mentioned this in passing before, but the Republic of Georgia continues to offer a one-year tourist visa for the asking upon arrival. If you’re from one of 96 nations and territories on this list, you can just land in Tbilisi, get a stamp, and hang out for a year if you’d like, no residency necessary. You’ll need proof of travel/health insurance plus there are work rules and potential tax implications, but nothing that can’t be worked around legally if you’re so inclined. Then when you’re approaching the limit, you could take a ferry to Turkey, a train to Armenia, or a budget airline flight to Europe and then start the clock over again when you return.
A weekly newsletter with four quick bites, edited by Tim Leffel, author of A Better Life for Half the Price and The World’s Cheapest Destinations. See past editions here, where your like-minded friends can subscribe and join you.
07/23/2622 July 2026
What’s in my NOW? — Dawn Friedman
issue #263
Dawn Friedman is a licensed clinical counselor and parent educator who lives in the Poconos. She operates Open Book Parenting, where she offers a weekly reflective journaling practice for parents raising anxious kids in a worried world, which is called, Tell Me It Will Be OK: The Practice. Readers can sign up for The Practice at http://openbookparenting.com.
PHYSICAL
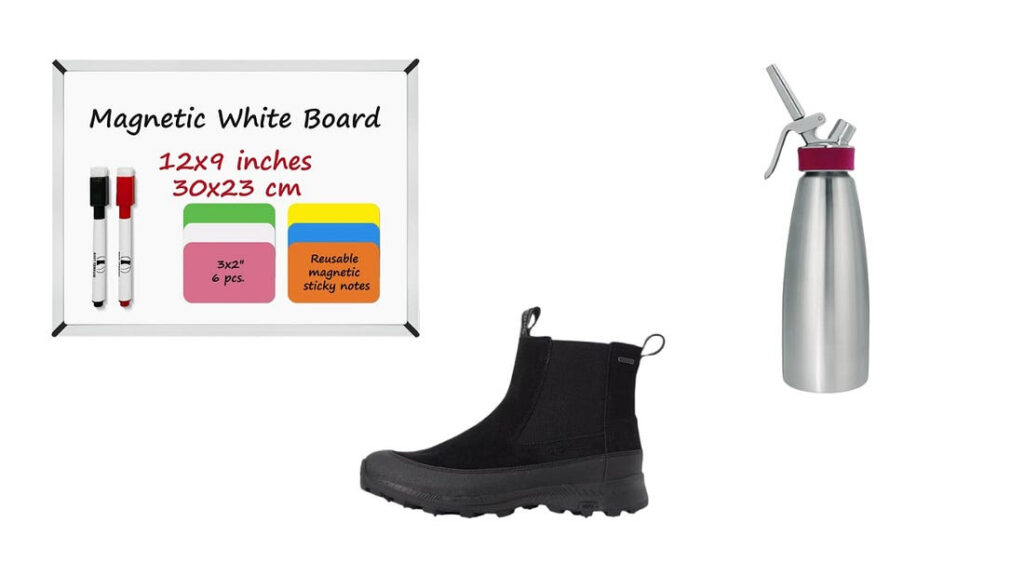
- White board Magnetic Sticky Notes: I bought four of these little white boards to organize three months at a time, with a bonus holding board. I write all of the tasks I do every month on a color-coded sticky note — each newsletter I write, the podcast, the guided reflective journaling recordings — and whatever extras I have coming up like a Keynote presentation I need to build or a course I need to finish. At the start of the month the little whiteboard is full and as I finish each task it either moves to the next month or gets erased and set aside on the bonus board, (which holds blanks and future tasks that aren’t happening in the next three months). I’m a visual person and I need to organize tasks away from my monitor so that I can glance up and see exactly what’s still on my to-do-list. These magnetic sticky notes help me not just get organized but feel organized, which is half the battle.
- Icebug Boda Women’s BUGrip: These cleated, waterproof boots have been a lifesaver for continuing my long walks in winter weather. This year we had a lot of ice and they did not fail. The metal cleats keep me stable even on unexpected black ice but are lightweight enough that they’re fine to walk over uncleared asphalt, too, which means stomping around my neighborhood is easy whether or not the plows have made it my way. They say you can walk over wet walks without slipping in them but I haven’t had the guts to try that yet.
- iSi Gourmet Whip: I got this because my husband’s one indulgence is whipped cream on his coffee throughout the day and I got tired of buying (and tossing) the store brand whipped cream containers. I found this for Father’s Day (along with a box of the nitrous chargers) and he’s in love. It’s fun to make whipped cream and play with flavors and it means a lot less waste. We got an open box version on eBay and so far, so good!
DIGITAL
- Endel Lifetime Subscription: I work best with a soundtrack but if the soundtrack is too good then I start paying attention to the music instead of my job. Endel links up with my Apple Watch to send me soundscapes that are ostensibly personalized to my circadian rhythm, the weather at my locality, what my watch senses I’m doing. I can let it autoplay or choose Focus or Relaxation and the tunes are unobtrusive enough that I let it play in the background on my bluetooth speaker when I’m seeing my therapy clients, too. I also use it on walks, where it changes the rhythm to go with my stride (although I don’t like it while running when I really want some thumping club music to keep me going). My husband swears his sleep is so much better when we play it at night, which is what inspired me to upgrade to the lifetime subscription.
- ScreenZen: I installed this donation-supported app after the election when I found myself coming to my clinical sessions agitated and distracted after reading the news and/or social media on my lunch hour. ScreenZen blocks distracting apps and websites but lots of apps do that — including Apple’s own system. But what I like about ScreenZen is that if you need to, you can open that app or that site but it makes you pause. It might ask you to ask yourself, “Why am I checking?” Or it might ask you to breathe first. I recommend it to clients because it allows us to be more mindful when we do want to push through the block. It not only broke me off my Threads rabbit holes but also made me notice why and when I was reaching for my phone.
INVISIBLE
There is a song by Jane Siberry on her album, About a Boy, called “The Gospel According to Darkness”. It’s a beautiful song on a beautiful album but there is a particular bit that moves me like no other. My mom had rough beginnings (understatement) and due to the way these challenges shaped her and our relationship, we haven’t spoken in years. I still love my mom and grieve the loss of her in my life and this image of her brand new, full of hope, with a chance for things to be different just wrecks me but in a good way. The lyrics to that part are:
“Oh, my sweet sweet darlin’ (Wait)
You know when you open up your eyes?
(Oh, I’m afraid there won’t be anyone)
I’m beaming you all this light (Something’s happening)
Who is it? (It’s a. I’m holding my sweet mama in my arms)
Is she dying? (No, I think she’s just been born)
Mmm hmm (And she looks, she look so… sweet)
I know there’s a place
(And she looks so… hopeful)
That you call your own
(And she looks so… trusting)
Safe and warm
(She doesn’t know, she doesn’t know how hard)
And you feel like you’re home”
On YouTube:

Sign up here to get What’s in my NOW? a week early in your inbox.
07/22/2621 July 2026
Mary Wept Over the Feet of Jesus / Rad American Women A-Z
Issue No. 127
MARY WEPT OVER THE FEET OF JESUS – AN EXPLORATION OF PROSTITUTION AS FOUND IN THE CHRISTIAN BIBLE
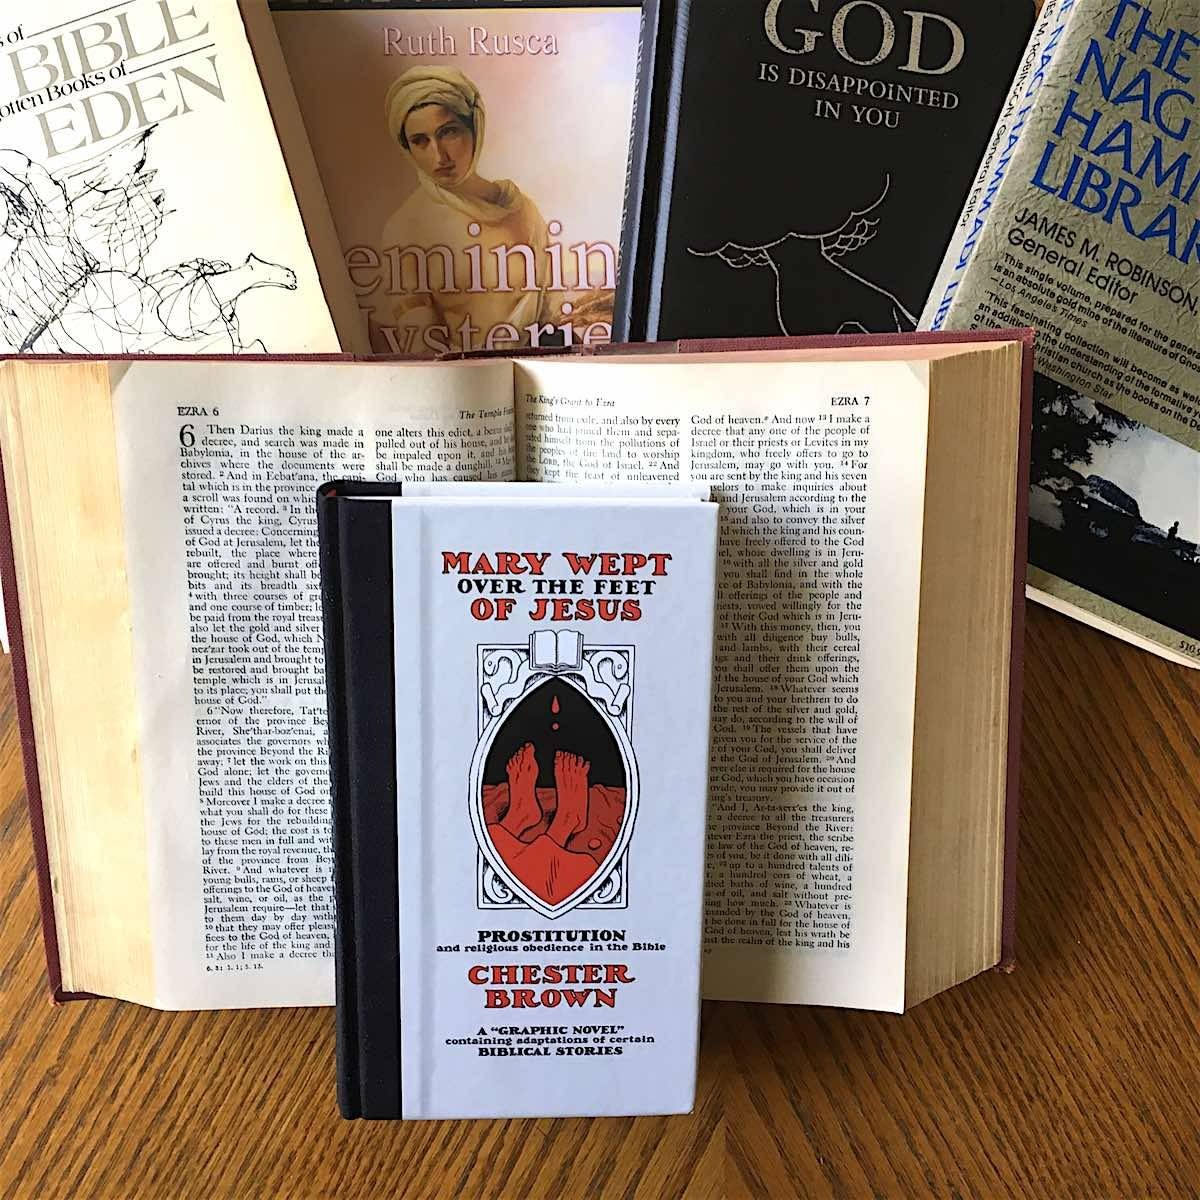


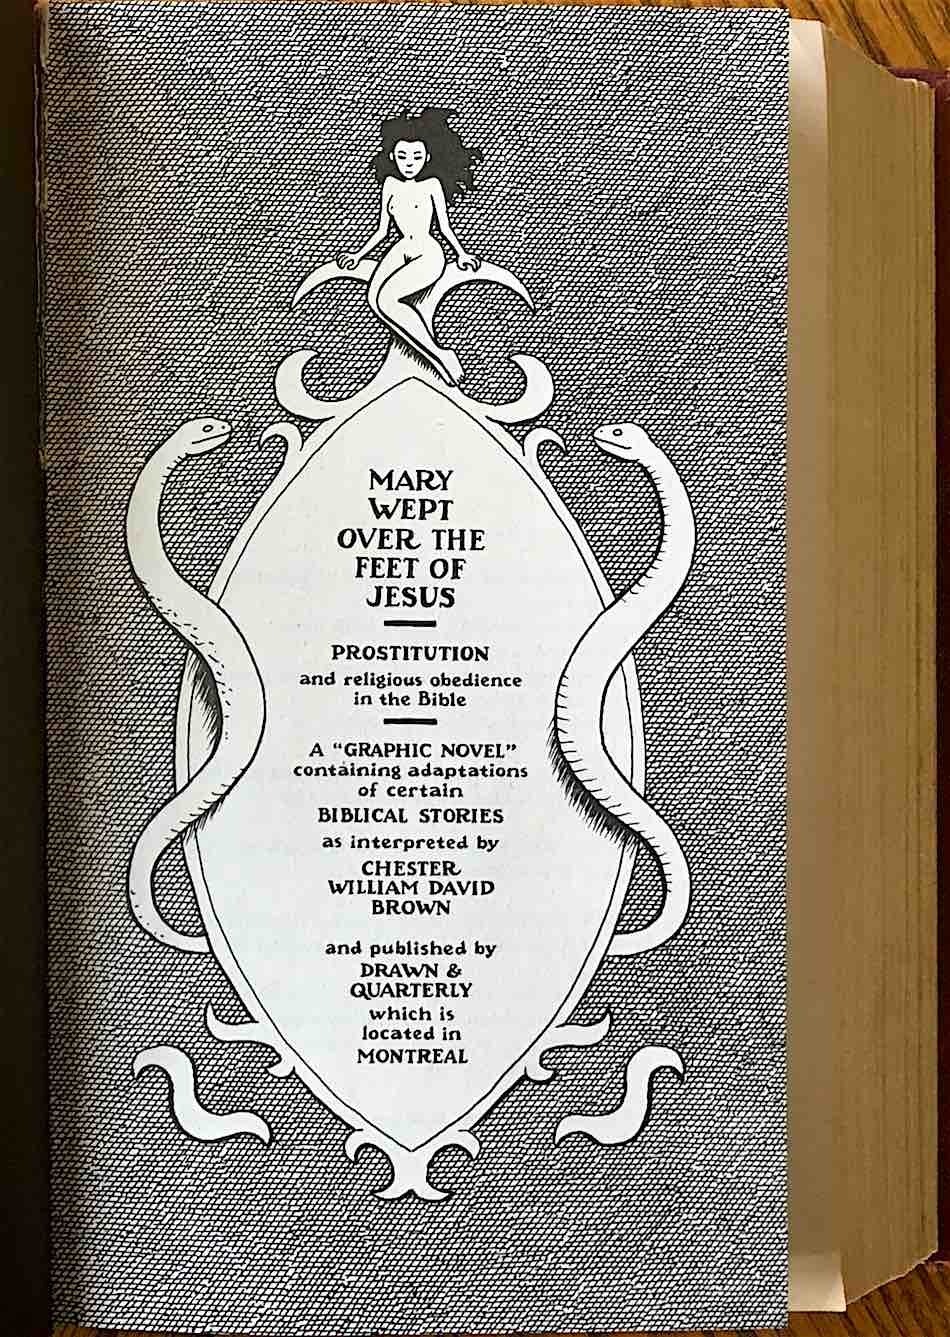

Mary Wept Over the Feet of Jesus by Chester Brown
Drawn & Quarterly
2016, 280 pages, 4.6 x 7.9 x 1 inches
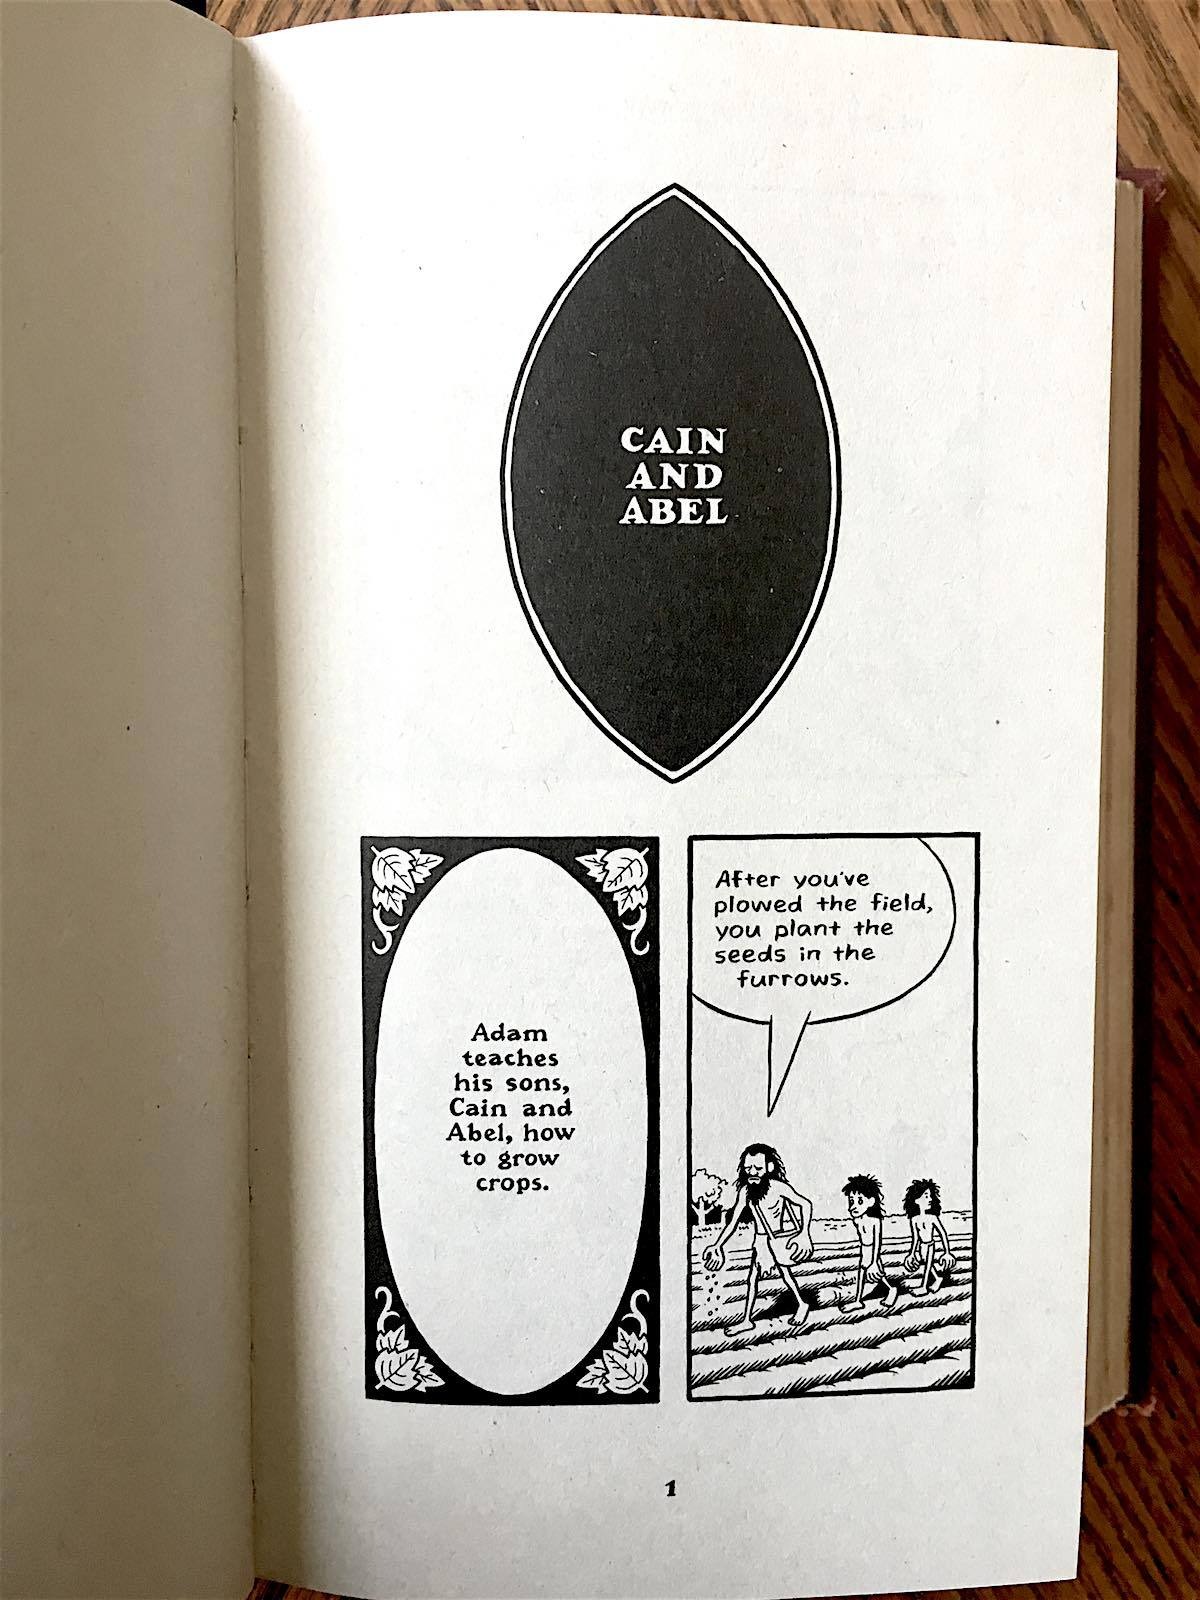
Mary Wept Over the Feet of Jesus is a strange, effectively touching, and surprisingly rigorous exploration of prostitution as found in the Christian bible. After doing extensive research on the subject, Chester Brown offers his graphical reimagining of the prostitute stories from the bible. Besides the tales of Rahab, Tamar, Ruth, and Mary of Bethany, we also get scenes from the lives of Bathsheba, Mary, Mother of Jesus, Cain and Abel, and others. Some of these stories seem out of place with the rest of the collection (e.g. Cain and Able and Job), with no apparent link to prostitution. But with them, Brown is sharpening one of his main points about following the spirit versus the letter of the law of religious obedience, a theme which runs throughout the book.
The meticulously rendered stories, eleven in all, have a strange, disarming innocence about them. There are moments of truly felt compassion and generosity encoded in some of these panels. But the comics are really only half of the book. The second half, over a hundred pages, contains all of the notes from Brown’s research. I found it an absolutely fascinating look, not only into the academic research and religious texts that he cites, but into his own thinking, and his confirmation biases. The whole book feels more like a captured thought process, a research notebook, than a typical narrative or expositional work. That’s part of what makes this book so unique and interesting to me, but it may turn off others for the same reason.
Mary Wept Over the Feet of Jesus is basically Chester Brown’s presentation of his belief that Jesus did not condemn prostitutes or prostitutions and that it is very possible that his own mother, Mary, may have been a prostitute. Or at least pregnant with a baby that wasn’t Joseph’s. Brown makes his case by looking at translation drift/censorship of key words from the bible, by reexamining all of the passages about prostitutes, by citing modern scholarship, and by offering his own speculations.
In many ways, Mary Wept Over the Feet of Jesus is a follow-up to Brown’s highly acclaimed Paying for It, “a comic-strip memoir about being a john.” The cynical or faith-invested reader might easily dismiss Mary Wept as a very overwrought justification for Brown’s embrace of prostitution and sex work. One uncharitable Amazon customer went in an entirely different direction with “it’s finally apparent to what extent Chester Brown thinks he’s Jesus.”
Messianic complexes and personal justifications aside, I found Mary Wept extremely engaging and thought provoking. It is eccentric, ponderous, and beautifully rendered books like this that renew my faith in humanity. Or at least in humanity’s adventurous small press publishers. – Gareth Branwyn
RAD AMERICAN WOMEN – ATHLETES, WRITERS, ROCK STARS AND OTHER HEROINES WHO HELPED SHAPE OUR WORLD


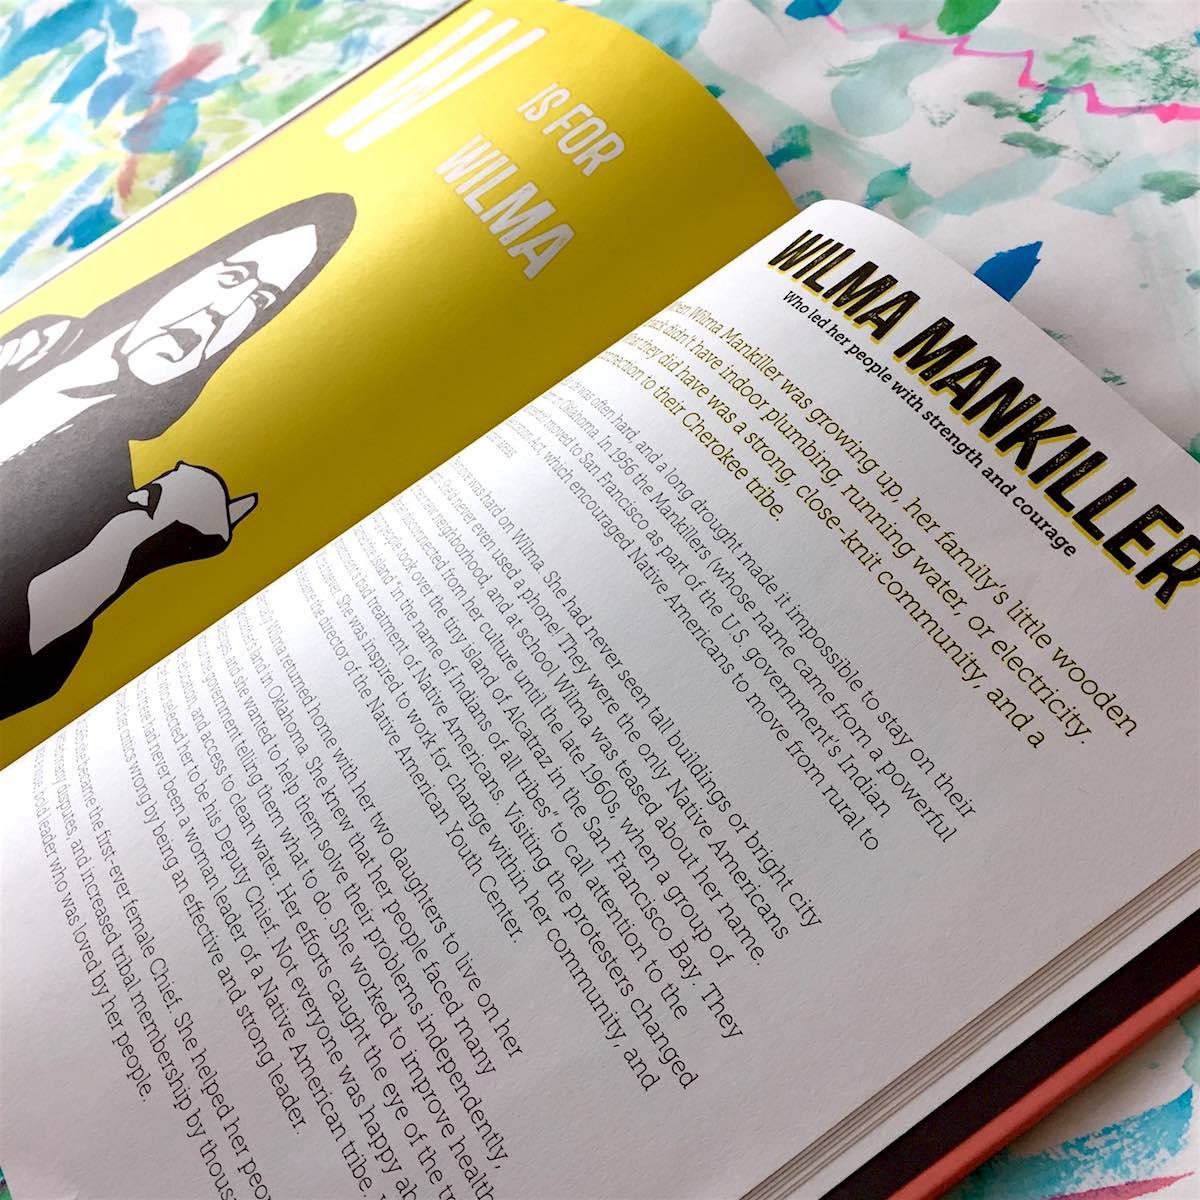
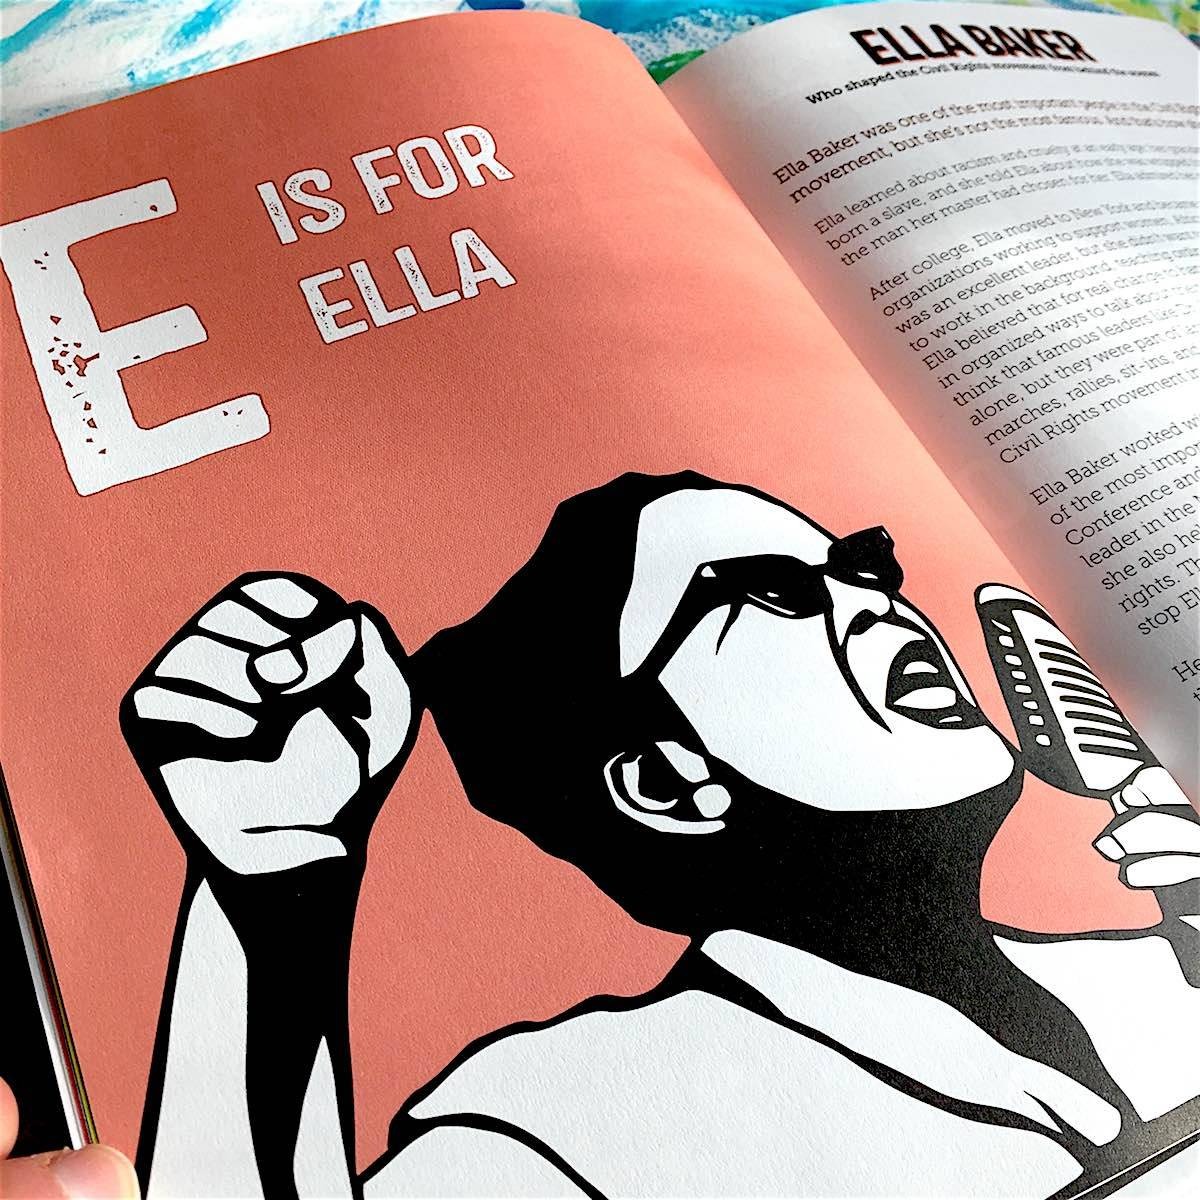
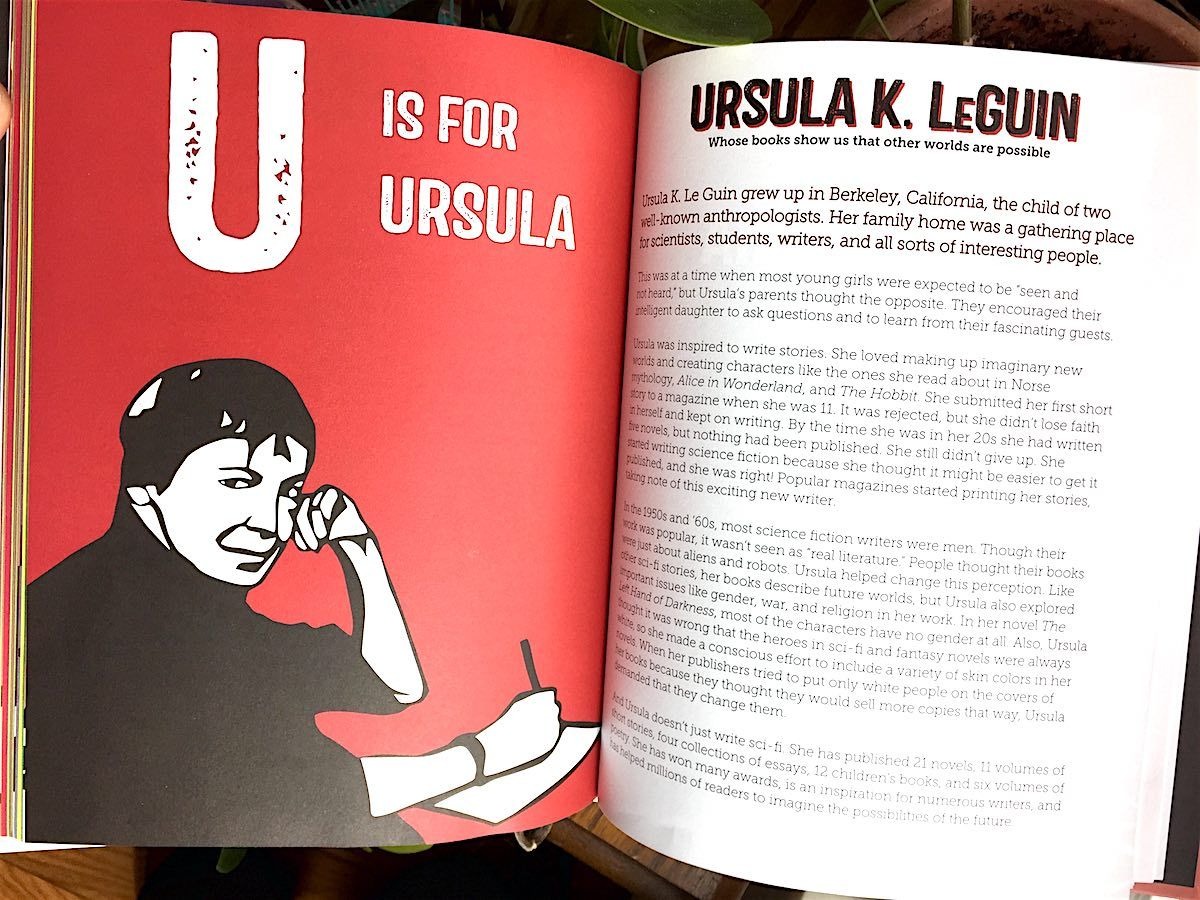

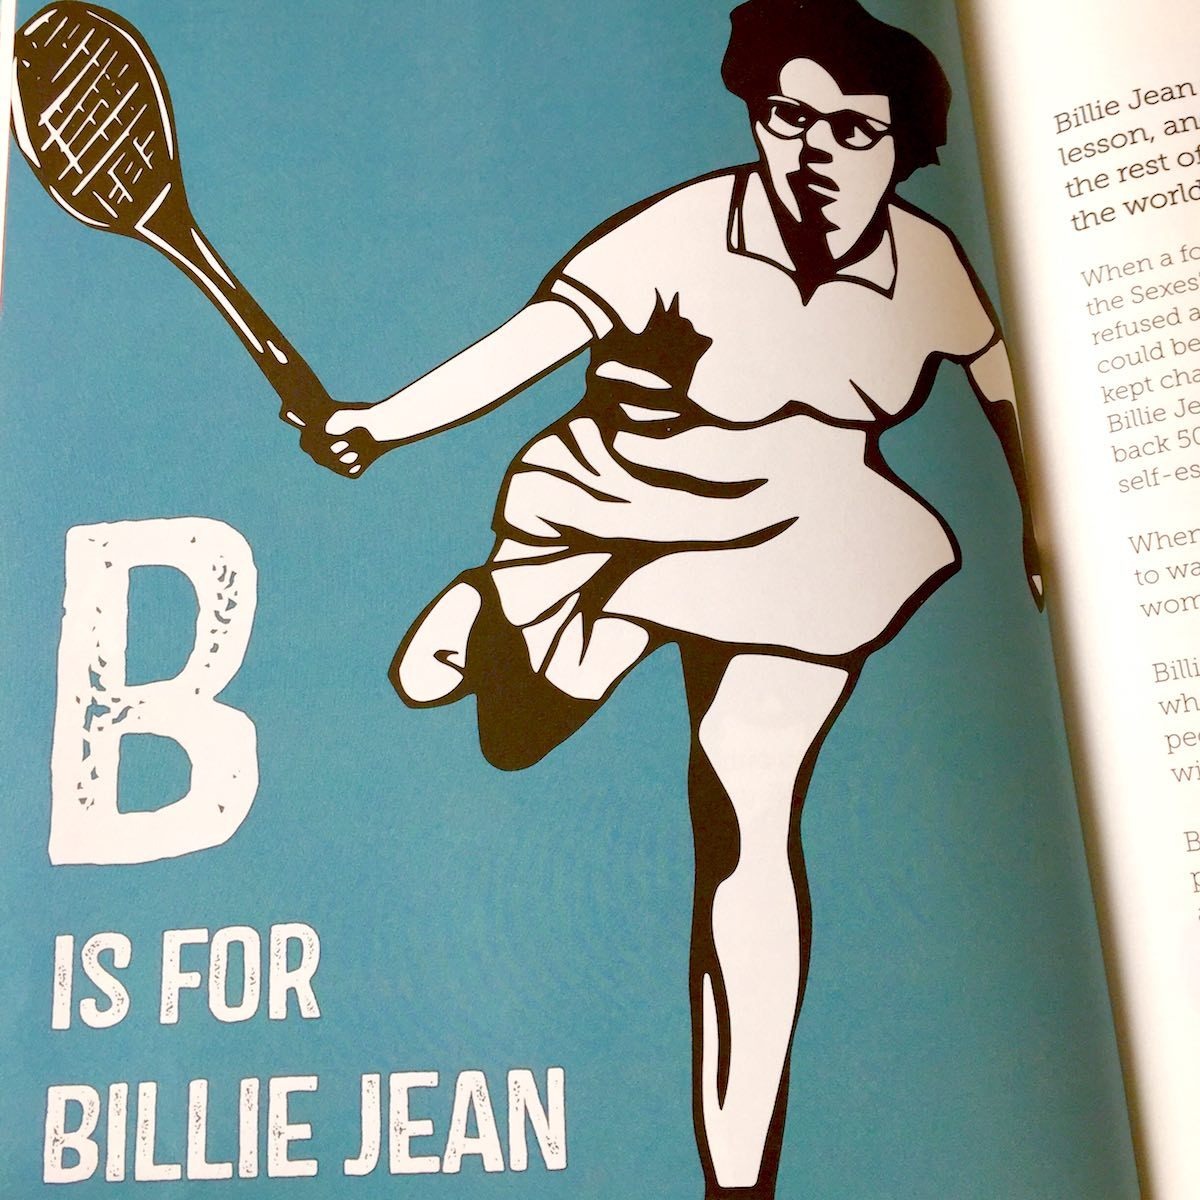
Rad American Women A-Z: Rebels, Trailblazers, and Visionaries Who Shaped Our History… and Our Future by Kate Schatz (author) and Miriam Klein Stahl (illustrator)
City Lights Publishers
2015, 64 pages, 7.3 x 9.1 x 0.4 inches
Activists, artists, pioneers. Rad American Women A-Z takes readers on an alphabetized journey through the lives of women throughout the country and across time “who fought,” “who led,” and “who soared.” Every woman’s story begins with an action: there are no passive heroines in this historical feminist primer.
Each biographical sketch by Kate Schatz is accompanied by a crisp, black and white print from Miriam Klein Stahl. The author and illustrator team create a tone that is both conversational and immediate. The brightly colored background of each portrait seeps across from image page to text, highlighting each woman’s name and drawing readers into her story. This alphabet book meets call to action lends itself to a wide range of readers, using accessible, explanatory language (“A union is an organization that helps protect the rights of people who have the same kind of job.”), bold, dynamic illustrations, and a traditional walk through each letter of the alphabet (“J is for Jovita,” and “K is for Kate.”). I’ve been reading it with my three year old knowing that even on the days we use it only to practice the alphabet, she’s getting a dose of empowerment and diverse herstory. Though many of the women profiled are easily recognizable agents of change, Rad American Women introduced me to others I hadn’t heard of and began to flesh out the origin stories and broader social contexts of the women I already knew. Through the work of greats like Billie Jean King, Angela Davis, Temple Grandin, and Maya Lin, this book does an excellent job introducing the concepts of identity, intersectionality, and straight-up girl power, simply by telling the stories of real, radical women.
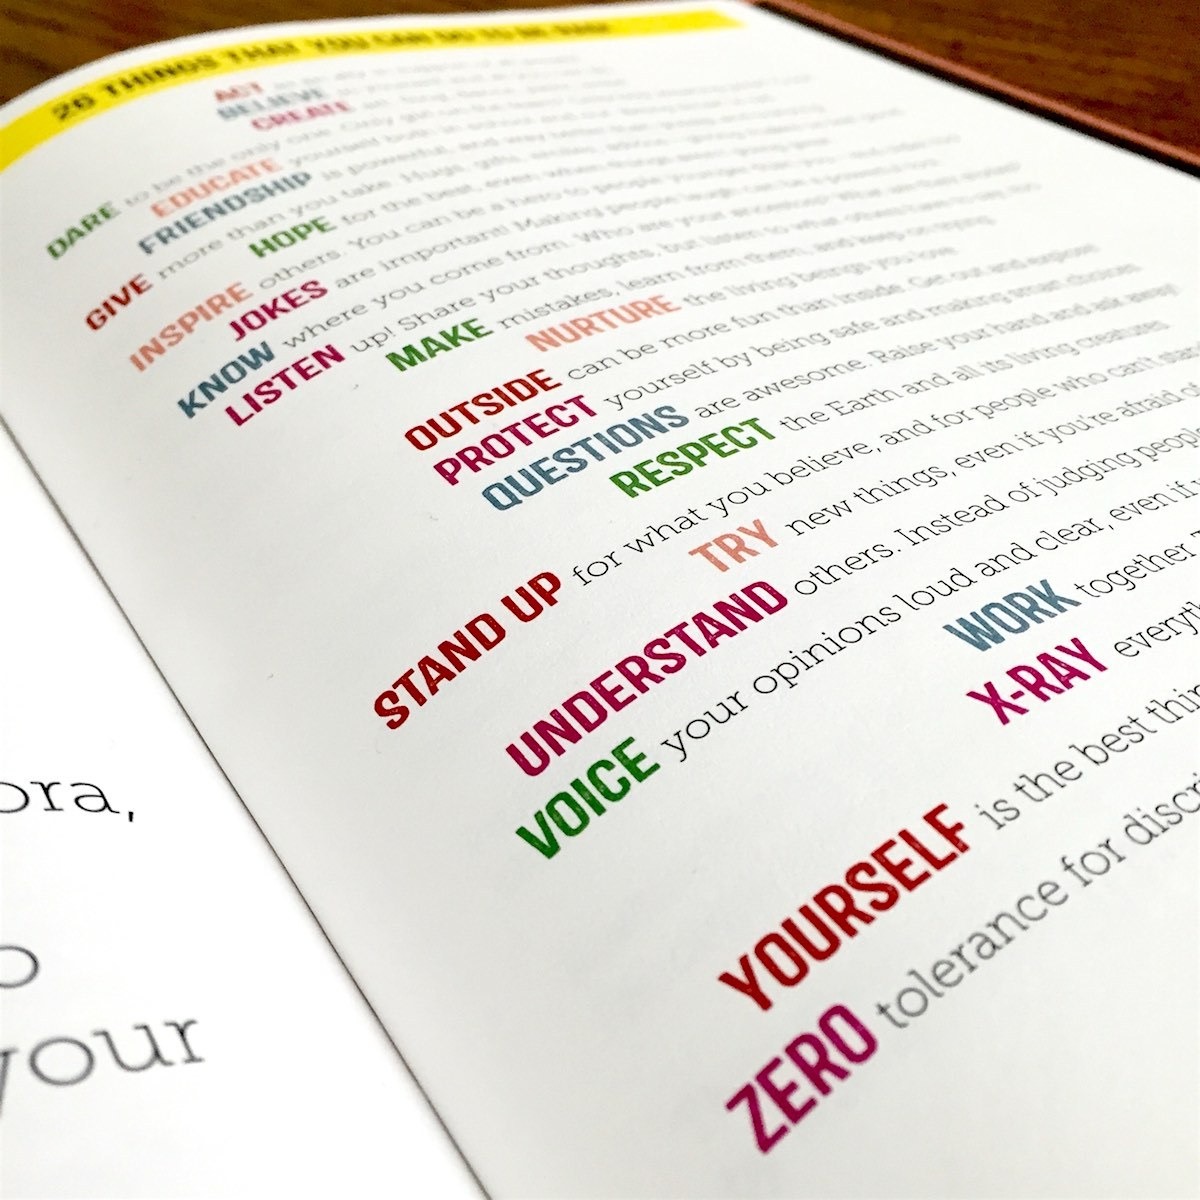
It’s easy to forget that “rad” is short for radical, and even easier to forget what being a radical really means. In addition to the snapshots of rad women that make up the bulk of the book, there is a brief resource guide at the end for further reading, as well as the alphabetical acrostic, 26 Things That You Can Do To Be Rad! Armed with this list of ideas for cultivating social change through basic, individual actions, Rad American Women readers, no matter their age or identity, will connect with, and aspire to be like, one of the athletes, organizers, writers, or rock stars whose actions shaped the world we live in today. – Mk Smith Despres
Books That Belong On Paper first appeared on the web as Wink Books and was edited by Carla Sinclair. Sign up here to get the issues a week early in your inbox.
07/21/2620 July 2026
Cookers
Tools for Possibilities: issue no. 199

Versatile one pot meals
Last summer I tried some carrot soup that tasted like buttered toffee. It had been made in a pressure cooker, which heats water vapor above boiling temperature, greatly reducing normal cooking times. I told my parents I was going to get a pressure cooker, and they recommended the Fagor multi cooker, because unlike most pressure cookers it has an electric browning feature, which lets you brown beef, fish, or chicken right in the pot before you pressure cook it, greatly improving the flavor.
The Fagor is also a slow cooker and a rice cooker. Because it is so versatile, I use it almost every day. The throw-everything-in-the-pot-and-push-a-button approach has broadened my cooking horizons. I’ve made rib roast in the slow cooker that had my in-laws coming back for thirds. I’ve made mouth-watering chicken stuffed with sun-dried tomato pesto, basil and goat cheese in a matter of minutes. I’ve made salmon with spinach and lemon sauce, fennel and Italian sausage, creamy risotto, and spicy Bolognese sauce. Thanks to an online army of pressure-cooker devotees, I’ll never run out of recipes.
The only negative thing about the Fagor is that the user interface doesn’t make it clear when it is cooking. A couple of times I’ve set the timer and forgotten to press the start button, only to find out twenty minutes later that it never started. I’ve learned not to do that. — Mark Frauenfelder

Instant hot water source
Zojirushi Electric Dispensing Pot
Like the rice cooker, the electric dispensing pot is an appliance that EVERY Japanese household has. Its function is simple: It heats and dispenses hot water at just-below-boiling, as much or as little as you want. Perfect for a cup of tea or a cup of noodles. There’s even a “Keep Warm” feature for maintaining the water temp at 208F, 195F, or 175F for a set amount of time.
We picked up Zojirushi’s 3.0-liter US version when we moved back from Japan. It’s performed flawlessly for well over a decade. Lots of nice little touches: The “MagSafe” magnetic power cord featured in Apple’s laptop computers? Zojirushi did it first; makes it easy to move the pot to the tap to fill it up. — Robert Woodhead

Best cheap nuke-it popcorn maker
Nordic Ware Microwave Corn Popper
This microwave popper is simplicity itself: 1/2 cup of corn, a little oil (or not), and a little time in the microwave yields a low-cost, low-cal snack you can eat right out of the popper. Unlike other poppers or Tupperware containers, the Nordic Ware’s top cover has nifty ridges that facilitate comfortable removal — i.e. when everything is very, very hot (If you don’t remove the cover immediately, the popcorn gets too moist).
I’ve tried a variety of devices on my long march to the perfect popper… table-top poppers often made a mess (and big noise) and they’re not machine-washable. Some microwave poppers require pads that deteriorate with use and need to be replaced, but are difficult to find. The stove top method, I just could never fully master: burned pans, burned corn, mess to clean. Lastly, microwavable bags of popcorn: If you eat a lot popcorn, you’ll be spending exorbitant sums and — depending on which brand — consuming chemical additives. The Nordic popper does not require oil, so the end-product is essentially the same as an air popper. The Nordic can go in the dishwasher, or just be wiped clean. Plus, the Nordic is perhaps the least expensive one out there. As of late, we’ve been producing popcorn five nights a week. — Daniel Wilson
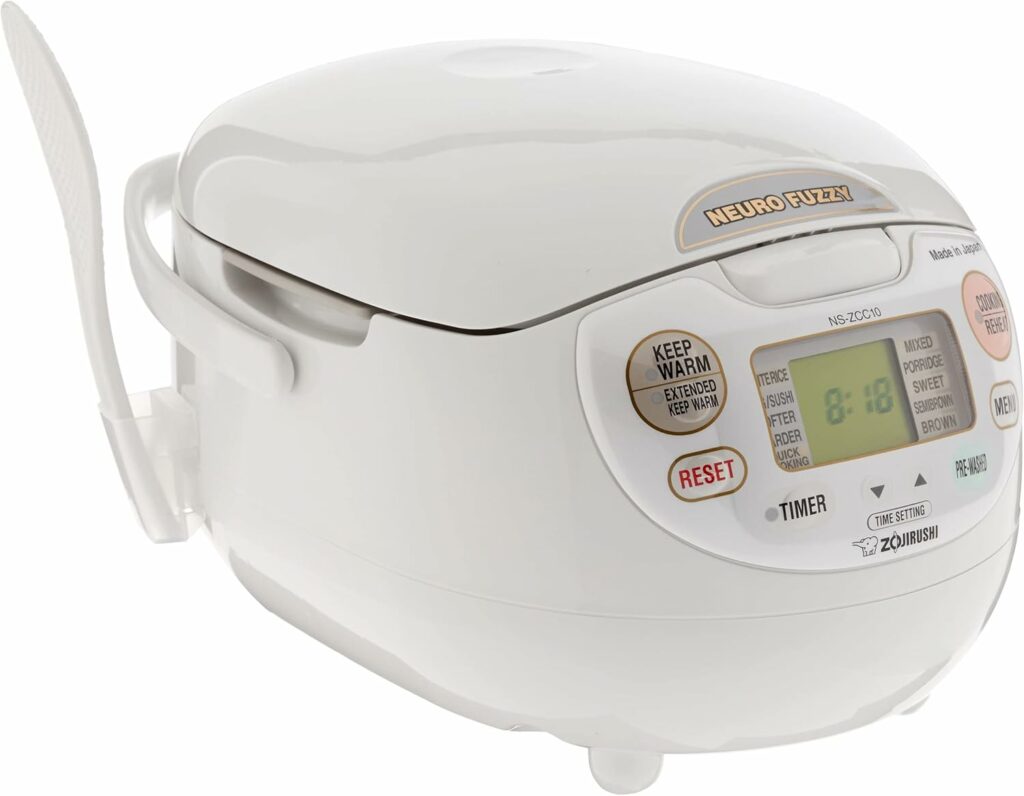
Smart grain cooker
This is the best thing with a plug. Pop water and rice in the bowl, set the timer, and you’ll have a perfect bowl of rice waiting for you when you get home. Don’t worry if you get hung up in traffic, the Zojirushi will keep your rice perfectly moist, and warm.
— Chris S.
Commonly used in Japan, this type of fuzzy-logic rice cooker can be set ahead of time. I’ve purchased several for friends and family and have settled on the Zojirushi brand. I’ve used a Zojiriushi for several years, and it has held up well and completely changed my cooking habits.
In the evenings I load up the pot with oatmeal and/or grain mixture for hot breakfast the following morning. And the mornings, I load up the pot for dinner – rice, whole grains, barley, lentils, beans, and/or spices. When I walk into the house after work, the air is fragrant with cooking. The cooker can keep its contents warm and fairly fresh for a few hours after the timer goes off.
My favorite model is the Zojirushi NS-ZAC10 (5 cup capacity) though I’d get the larger model if I had a bigger family. — Douglas O’Heir

Non-Electric Slow-Cook
Ever wish you could whip up a pot of chicken and dumplings, go on your bike ride or canoe paddle or even just hike, and have it piping hot and ready for you when you get back to the car? Ok, more likely it rained or snowed on your ride/paddle/hike and you’re shivering and wish you had any hot food back at the car. This is experience speaking.
Nissan, the makers of vacuum mugs to keep your coffee warmer longer, also makes a 4-quart powerless crockpot. No plugs. No heater. It’s wonderful.
Here’s how it works: pull the inner pot out of the device and put it on the range at home (or the stove at camp). Insert ingredients. Heat ’em up to a boil. Put the inner-lid on, then insert the inner pot into the outer pot. Seal the outer-lid. Put the whole device in your car (or your boat, or your dogsled). Have some fun for 3-6 hours. Open the pots and dish out the steaming food.
Incredibly, the first time this device was debuted in the U.S., it was marketed towards tailgaters and, well, flopped. But I had heard about it, and even though it was unavailable on this continent, managed to have a pot shipped over from Taiwan.
Avid outdoorswoman that I am, I had other uses for this kitchen gadget then side dishes for the football stadium parking lot. One morning, I shucked into my wetsuit and paddled into Emerald Bay in Lake Tahoe and back, fighting the chill May wind both ways. After landing the boat, I hopped on my mountain bike and rode the famous Flume trail from the highway up to the snow line. I saw thunderclouds across the mountains and booked down to the car, 2,000 feet below, almost making it before the rain began. I was shivery; just short of hypothermic. I was also happy that before I’d launched the bike, I had the foresight to boil elbow mac, burger, and canned tomatos in the Nissan Thermal Cooker. Hot food = life.
The crock pot has recently come back on the market, and is again being hyped as a tailgater essential. Bah. Tailgaters and church-potluckers aren’t going to shell out $149 for a crockpot. People who do endurance races in the northern climates: now there’s your target audience. And don’t forget that this crockpot is more electricity-efficient than the normal kitchen plug-in models; it takes none once it’s hot so it makes a great kitchen addition for the average treehugger. — Rita Nygren
Simple recipes:
1 lb hamburger, browned
2 cans diced tomato
1 lb of elbow mac
Combine ingredients, bring to boil, seal, wait 3 hours. Serves 2-4 people.
Rice-a-roni (any flavor)
Butter
Canned chicken
Fresh veggies, diced
Prepare rice as directed on box. When you get to the cover and simmer stage, dump in the chicken and veggies, then seal in pot. Cook a little longer then directions call for. Servers 2.
2 cans chicken broth
1 can chicken
2 cups wild rice blend
2 cups Simply Veggies (freeze dried vegetables)
Bay leaf
Salt & pepper
Combine ingredients and boil, leave over heat for 5-10 minutes. Seal in pot. Wait 2-4 hours. Serves 4-8 people.
Once a week we’ll send out a page from Cool Tools: A Catalog of Possibilities. The tools might be outdated or obsolete, and the links to them may or may not work. We present these vintage recommendations as is because the possibilities they inspire are new. Sign up here to get Tools for Possibilities a week early in your inbox.
07/20/26ALL REVIEWS

 07/18/26
Gar’s Tips & Tools – Issue #212
Access to tools, techniques, and shop tales from the diverse worlds of DIY
07/17/26
Book Freak #218: The Magus, by John Fowles
Why no one else can answer your most important questions

EDITOR'S FAVORITES
COOL TOOLS SHOW PODCAST
WHAT'S IN MY BAG?
22 July 2026
ABOUT COOL TOOLS
Cool Tools is a web site which recommends the best/cheapest tools available. Tools are defined broadly as anything that can be useful. This includes hand tools, machines, books, software, gadgets, websites, maps, and even ideas. All reviews are positive raves written by real users. We don’t bother with negative reviews because our intent is to only offer the best.
One new tool is posted each weekday. Cool Tools does NOT sell anything. The site provides prices and convenient sources for readers to purchase items.
When Amazon.com is listed as a source (which it often is because of its prices and convenience) Cool Tools receives a fractional fee from Amazon if items are purchased at Amazon on that visit. Cool Tools also earns revenue from Google ads, although we have no foreknowledge nor much control of which ads will appear.
We recently posted a short history of Cool Tools which included current stats as of April 2008. This explains both the genesis of this site, and the tools we use to operate it.
 Kevin Kelly started Cool Tools in 2000 as an email list, then as a blog since 2003. He edited all reviews through 2006. He writes the occasional review, oversees the design and editorial direction of this site, and made a book version of Cool Tools. If you have a question about the website in general his email is kk {at} kk.org.
 Mark Frauenfelder edits Cool Tools and develops editorial projects for Cool Tools Lab, LLC. If you’d like to submit a review, email him at editor {at} cool-tools.org (or use the Submit a Tool form).
 Claudia Dawson runs the Cool Tool website, posting items daily, maintaining software, measuring analytics, managing ads, and in general keeping the site alive. If you have a concern about the operation or status of this site contact her email is claudia {at} cool-tools.org.